SICE 2020 in Chiang Mai to be held ONLINE. Please see the
announcement.
Video Presentation Submission
1. No Show Policy
No-show papers are defined as papers submitted by authors who subsequently did not upload the video presentation. No-shows will not be available on IEEE Xplore or other public access IEEE forums. No refund of the paid fees can be claimed by the no-show author.
2. Video Submission Procedures
Please upload your pre-recorded presentation video (15 min/presentation) by following the procedures given below. The deadline for submission is Wednesday 9th September 2020. Any author who is registered as a participant can upload presentation video files. To avoid multiple uploads of the same file, please make sure to upload only one video file per presentation. Please note that papers without video upload will be treated as no-show papers.
-
Please access the following conference site:
https://sice2020-online.sice.jp/login/index.php
and login with your user name and password. The user name and password will be emailed to each registered participant from sice2020-secretariat [at] sice.or.jp by around Thursday 20th August 2020.
-
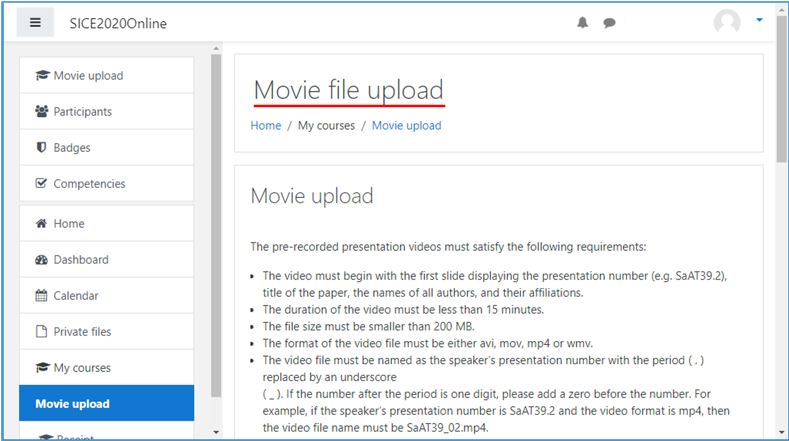
Please click the menu item “Home” on the left hand side of the frame, then the web link to the page titled as “Movie file upload” will appear on the top of the frame. By clicking the web link, please move to the “Movie file upload” page as shown below.
-
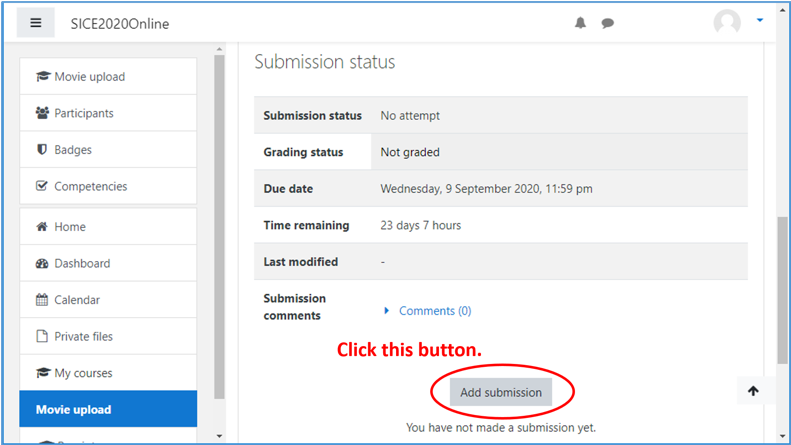
Please go down the “Movie file upload” page to the bottom, and then you will find the button labeled with “Add submission” as shown below. By clicking the “Add submission” button, the region for uploading your video file will appear.
-
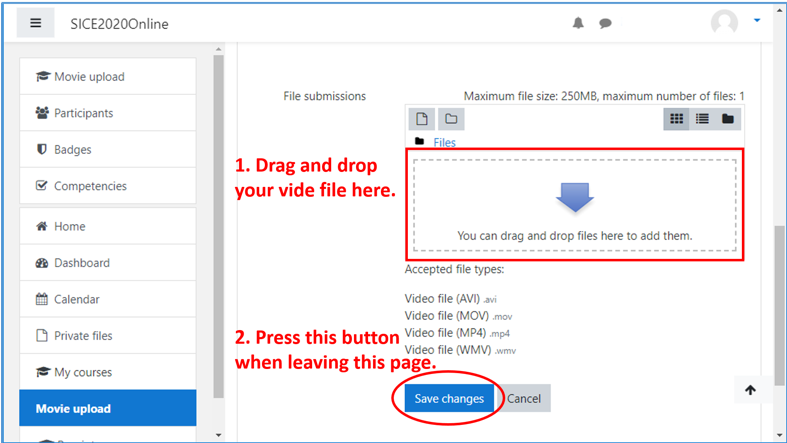
Please drag and drop your video file as shown below, then it starts uploading your video file. After the uploading is completed, please press the button labeled with “Save changes”, then the video file submission is completed. Please do not forget pressing the “Save changes” button, otherwise the uploaded file will not be saved on the submission site.
3. Video Upload Requirements
The pre-recorded presentation videos must satisfy the following requirements:
- The video must begin with the first slide displaying the presentation number (e.g. SaAT39.2), title of the paper, the names of all authors, and their affiliations.
- The duration of the video must be less than 15 minutes.
- The file size must be smaller than 200 MB.
- The format of the video file must be either avi, mov, mp4 or wmv.
- The video file must be named as the speaker’s presentation number with the period ( . ) replaced by an underscore
( _ ). If the number after the period is one digit, please add a zero before the number. For example, if the speaker’s presentation number is SaAT39.2 and the video format is mp4, then the video file name must be SaAT39_02.mp4.
- The presentation numbers will be shown on the conference program that will be posted on the SICE2020 website around Thursday 20th August 2020.
Uploaded videos will be encoded into the streaming video format with the following configuration:
- Video bit rate: 2M [bps]
- Video size: 1280 x 720 [pixels] (Aspect ratio 16 : 9)
- Video frame rate: 60 [fps]
If the specification of an uploaded video does not match the encoding configuration above, the specification will be adjusted automatically.
4. Software for Preparing Screencast Presentations (optional)
When the presentation video is prepared in screencast form, the speaker’s voice is overlaid along with the presentation slides. Also, you can place a small window displaying yourself over your slide show.
The subsections below briefly explain how to record and edit screencast videos. (It is not necessary for you to prepare your presentation in screencast form.)
4.1 Recording videos
The following software programs can be used for recording screencast presentations:
- PowerPoint (Windows, Mac):
- Get into the presentation mode by going for “Slide Show -> Record Slide Show” on the main menu. Turn on the camera preview if you want to display yourself.
- Start recording your presentation by clicking “RECORD”.
- Save the recorded presentation as an mp4 video file by going for “File -> Export” on the main menu.
- Zoom (Windows, Mac, Linux):
- Start a meeting with you being the only participant. Also switch on your web camera if you want to display yourself.
- Share the application window containing your presentation by clicking “Share Screen” on the bottom menu.
- Start recording your presentation by clicking “Record” on the bottom menu. The video file in an mp4 format will be produced after ending the meeting.
- OBS Studio (Windows, Mac, Linux):
- Set the format of the output video file to mp4 by going for “File -> Settings” on the main menu.
- Include the application window containing your presentation into the main frame by clicking the “+” bottom on the “Source” panel and then choosing “Window Capture”. At this moment you can also include the input of your web camera by choosing “Video Capture Device”.
- Start recording your presentation by clicking “Start Recording” on the “Controls” panel. The video file will be produced automatically in your default video folder.
4.2 Editing videos
There is no need to record a complete presentation at once as you can edit recorded videos. For example, you can cut out NG scenes or extract well-taken scenes by using the following software programs:
-
Photos (Windows) is native software provided for Windows, and can be used for trimming and merging videos.
-
iMovie (Mac) is native software provided for Mac, and can be used for trimming and merging videos.
-
DaVinci Resolve (Windows, Mac, Linux) is freely available software, and suitable for those familiar with video editing as advanced manipulations are possible.
The final video must satisfy the requirements described in Section 3 above. If your video file size exceeds 200 MB, you could try using a plain white background or reducing animations. You could also consider lowering the resolution of the video itself.
